Choice Block
Choice Block
The Choice block presents options to the player and branches the story to different chapters based on the pick. It is the core device for splitting a visual novel's story into multiple paths.
Adding a Choice
- Select the line the choice should follow (usually the last line of dialogue).
- Press [Choice] on the insert bar. A choice line appears right after the selected line, starting with two options.
- Click the choice line to open the Manage choices strip under it. Type the text for each option and set where it goes.
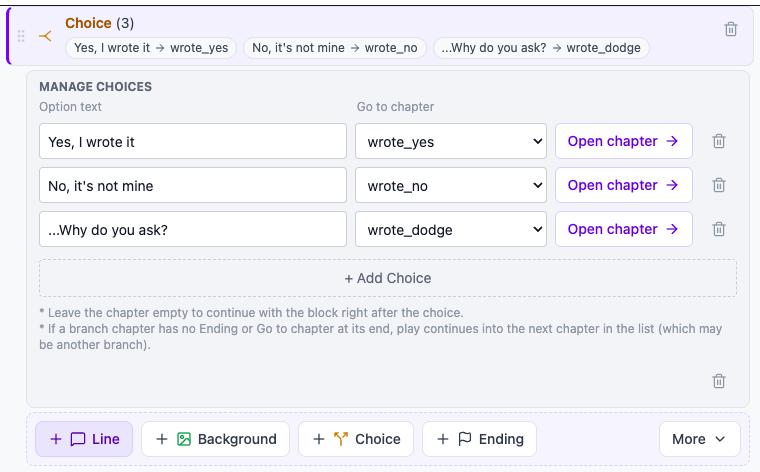
The choice line itself shows a title such as "Choice (2)" and one chip per option (such as "Go left → go_left"). A chip whose destination is set is a button — click it to jump straight to that chapter. A chip that points to a chapter that does not exist turns red, and a warning such as "2 option(s) point to a missing chapter" appears with it.
Key Properties
Manage choices under the choice line has the column headings Option text and Go to chapter, with one row per option.
- Choice Text (text) — The text shown to the player. A new option's text field shows the hint "Type the choice text…".
- Go to chapter (jumpLabel) — The chapter to go to when this option is picked. You choose it from the chapters in your list, so you can link options without typos. Leave it empty and it reads "— (continue after the choice)": picking that option simply continues with the block right after the choice.
Two lines of help text sit below the rows: an empty field continues with the next block, and a branch with no Ending or jump at its end falls through into the next chapter.
Option Rows and Action Buttons
Each option row has, from left to right, a text field, a chapter selector, an action button, and a delete (trash can) button.
- [+ Add option] — Under the rows, this adds one more option. There is no hard limit on the number of options, but 2–4 per block usually reads best.
- Remove option — The trash can at the right of a row removes just that option.
- Action button — One of two buttons appears depending on the state of the destination:
| Go to chapter | Action button | What it does |
|---|---|---|
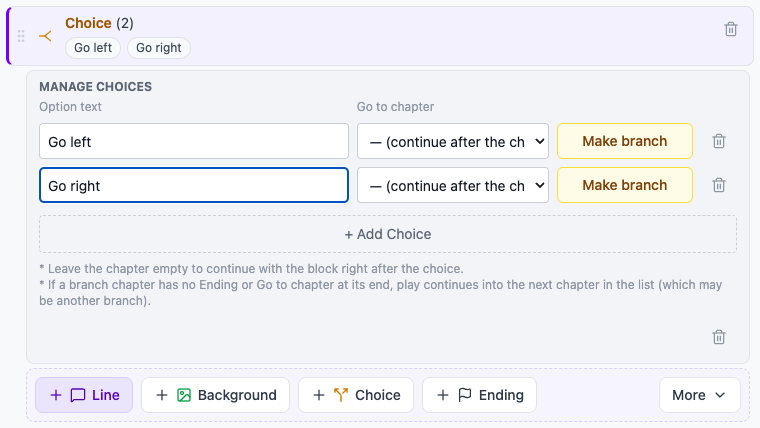
| Empty, or a name not in the list | [Make branch] (yellow) | Creates branch chapters and opens this option's branch |
| A chapter in the list | [Open chapter →] (purple) | Jumps to that chapter |
Making Branches
You do not have to build branch chapters by hand. Press [Make branch] on an option whose destination is empty. Hovering over it shows "Creates a chapter for every option that has none, then opens this one".
- Type the text of each option first — the text becomes the chapter name, so writing it first saves you naming work.
- Press [Make branch] on any option.
- A branch is created for every option that has no chapter, all at once. Each branch is made of a chapter line + an empty dialogue line + a Go to chapter back to the rejoin point.
- The view scrolls down to the branch of the option you clicked and places the cursor on its empty dialogue line. Start typing the dialogue right away.
- For the other options, go back to the choice and press [Open chapter →] on each.
Branch chapter names are generated from the option text.
Go left→go_left,문을 연다→문을_연다- An option whose text is still empty gets
choice_1,choice_2, … style names. - A name that starts with a digit gets a
c_prefix, and a name that is already taken gets_2. - The rejoin chapter is named
after_choice. If another branch already uses a rejoin point, it is reused instead of making a new one. - If you do not like a name, rename it later in the Chapter name field of the chapter line. Every choice and jump that points to it is updated too. When renaming, edit the characters in place rather than clearing the whole name first — if the name passes through an empty value, the choices, conditions, and Go to chapter blocks pointing at it are not updated.
Fill in the empty dialogue lines and the branches merge back into one story afterwards.
Moving Between a Choice and Its Branches
As choices grow, branch chapters end up scattered through the list. There are three ways to move between them directly:
- Choice → branch: the option chips on the choice line. Click an option chip such as "Go left → go_left" to jump to that chapter. [Open chapter →] in Manage choices does the same.
- Branch → choice: the "← Choice" chip on the chapter row. Under the title line of a branch chapter you will see a chip like
← Choice "Go left". Click it to go back to that choice line. At most three chips are shown; press [+n] to see them all.← Go to chapter (in 'start')and← Condition (in 'x')chips appear in the same place. - Branch → rejoin point: the chapter name in the end strip. Under the last line of a branch, "Then → go to chapter 'after_choice'" shows the chapter name as an underlined button. Click it to jump there.
Whichever way you move, the line you land on is highlighted in purple for 1.5 seconds. If you were filtering by chapter pill, the filter switches to the chapter you arrived in, so the line is never hidden.

Always Check the End of Each Branch
A Chapter block is only a name tag, so if a branch chapter has no Ending or Go to chapter at its end, play continues into the next chapter in the list. If that next chapter is another option's branch, the player will also see the branch they did not choose. These spots are marked in the end strip with a red warning ("Then the unchosen branch 'x' plays next") and with a red banner at the top of the list ("N place(s) where an unchosen branch plays next.", with a [Show first] button). Use the [Add Go to chapter] button in the end strip to choose where the branch should rejoin. Branches made with [Make branch] already contain a Go to chapter to the rejoin chapter.
Usage Tips
- Close every branch — End each branch with an Ending, or rejoin a shared chapter with Go to chapter.
- Text first, branches second — Write the option texts, then press [Make branch], so the chapter names are generated from your text.
- Testing a branch — The Stage is view-only and you cannot click choices in it. Select the first line of a branch and press [● Play from here] under the Stage, or use [Play] in the header to go through from the start.
- Verify in Flow View — As choices grow, switching to Flow View with [Script | Flow] in the header is the clearest way to see how they connect. You can even reroute destinations directly from Flow View by dragging a new connection from a chapter node's output handle to the target node.
- Keep choice text concise — A line or two is easiest for players to read and decide.
- Make choices meaningful — If every choice leads to the same outcome, the decision feels empty. Try to make each choice lead to a distinct experience.